Secrets
Secrets are configuration values like passwords and API keys that you don’t want to share with everyone, but are necessary for automating releases. Many systems for deployment require you to store these under source control and give up too much information to anyone who works on a product.
Powerdelivery stores encrypted secrets in your source code, but lets you choose who to share the key with. You can use different keys for different secrets, giving you fine-grained control over who can use them in a single code base.
Generating keys
Powerdelivery encrypts secrets with a key file that you must generate. Whoever has access to the key file will be able to decrypt secrets stored with your source code, so record it somewhere safe, don’t store it with the source code, and only hand it out to those who you trust!
The PowerShell session below demonstrates this using the New-DeliveryKey cmdlet:
PS C:\MyApp> New-DeliveryKey MyKey
Key written to "C:\Users\Jayme\Documents\PowerDelivery\Keys\MyApp\MyKey.key"
Upon running this command, copy the key file from where it was generated and save it somewhere safe. I can’t stress this enough - do not store the key file with the project’s source code! You have been warned.
Storing secrets
With a key file such as the one generated above, you can now store any number of secrets. This is done with the New-DeliverySecret cmdlet which stores them as an encrypted value in the Secrets directory of your project.
The PowerShell session below demonstrates storing a secret:
PS C:\MyApp\MyAppDelivery> New-DeliverySecret MyKey MySecret
Enter the secret value for MySecret and press ENTER:
**********
Secret written to ".\Secrets\MyKey\MySecret.secret"
You should commit this new file to your source control.
Using secrets
With the secret added to your project, you can use it by referencing the Secrets property of the $target parameter in variables, environments, or roles.
An example of accessing a secret in a role:
Delivery:Role {
  param($target, $config, $role)

  $mySecretValue = $target.Secrets.MySecret
}
Tips
- If you find that your secret isn’t available, you may be missing the key file needed. Powerdelivery attempts to decrypt all secrets it finds in the Secrets subdirectory, but those for which keys are not present will be unavailable when the role executes.
- You may use secrets in configuration variable scripts, environment scripts, and role scripts. The above example is just a demonstration of doing so in a role.
Distributing key files
To enable your build server or any other person to run powerdelivery targets against an environment that uses a secret, you need to provide them with the key file used to encrypt them. You should only do this for computers you are permitting to decrypt the secrets necessary for deployment into the environments they are permitted to. This is why we didn’t store the key file along with the product’s source code.
Key files must go in the directory:
C:\Users\[User]\Documents\PowerDelivery\Keys\[Project]\Keys\[Key]
Using secrets for credentials
Credentials are username and password pairs that identify a user. They can be used to impersonate a different user account than you are logged in as when running a target. They can also be used in roles to access credentials needed for secure cloud resources such as Windows Azure accounts.
Applying roles to nodes using credentials
If a remote node is only accessible using a different Windows account than the user running powerdelivery, you can use credentials to connect to it. A common scenario where this occurs is when the user running powerdelivery is not on the same domain as the nodes they are deploying to.
Step 1. Generate a secret key
Use the procedure described in generating a secret key to generate a key file for encrypting secrets.
Step 2. Encrypt credentials with the key
Pass the name of a key to the New-DeliveryCredential cmdlet with the username of an account. This must be run from the directory containing your project. The cmdlet will prompt for the password and write it to an encrypted file under the Secrets\[KeyName]\Credentials directory.
The PowerShell session below demonstrates writing credentials to a file using a key:
PS C:\MyApp\MyAppDelivery> New-DeliveryCredential MyKey "MYDOMAIN\opsuser"
Enter the password for MYDOMAIN\opsuser and press ENTER:
**********
Credentials written to ".\Secrets\MyKey\Credentials\MYDOMAIN#opsuser.credential"
You should commit this new file to your source control.
Step 3. Add the credentials to environment nodes
The last step is to add these credentials to any nodes in envrionments that will deploy using them.
Below is an example Production environment script using credentials:
param($target, $config)
@{
  Build = @{
    Nodes = "localhost";
  }
  Database = @{
    Nodes = "x.x.x.1", "x.x.x.2";
    Credentials = "MYDOMAIN\opsuser";
    Authentication = "Kerberos"
  }
}In the example above, when roles are applied to nodes in the Database set, PowerShell will connect to them using the MYDOMAIN\opsuser credentials using the Kerberos authentication prototocol.
Tips:
- You must add any users that will deploy using powerdelivery to the Windows Remote Management Users or Administrators groups. If the user is not a member of one of these two groups, they will get Access Denied errors.
- Depending on whether you are using DNS names, NetBIOS names, or IP addresses for hosts; you may need to specify additional connection settings on your environment nodes if you encounter PowerShell remoting errors.
Using credentials in local roles
You may also encounter a need to use credentials in the role script itself, for instance to authenticate with Windows Azure to manipulate cloud resources. To do this create a key file and encrypt credentials following the steps above.
In your role script, use the Credentials property of the $target parameter to retrieve your credentials by username. You may then pass them to other PowerShell cmdlets that expect credentials.
The example local role script below uses credentials for me@somewhere.com:
Delivery:Role {
  param($target, $config, $role)

  # Get Azure credentials encrypted by powerdelivery
  $azureCredentials = $target.Credentials["me@somewhere.com"]

  Import-Module Azure

  # Add my credentials so I can use other Azure cmdlets!
  Add-AzureAccount -Credential $azureCredentials
}Tips
- If you find that your credentials aren’t available, you may be missing the key file needed. Powerdelivery attempts to decrypt all credentials it finds in the Credentials subdirectory, but those for which keys are not present will be unavailable when the role executes.
- If you need to use different credentials in the role depending on which environment is being targeted, consider using a configuration variable for the username.
Using credentials in remote roles
If you need to use credentials in the role script itself but this will run on a remote node, the credentials will be blocked from traveling to the remote node unless you configure a local security policy setting on the computer running powerdelivery.
Step 1: Locate the local security policy to change
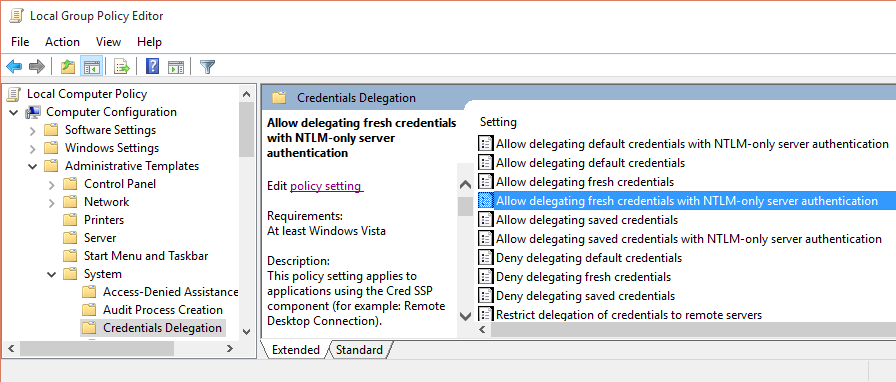
On the computer running powerdelivery (whether an individual’s computer or a build server), run gpedit.msc. This will open the Group Policy editor. Expand the tree that appears on the left to locate the folder:
Computer Configuration -> Administrative Templates -> System -> Credentials Delegation
Once you’ve located the folder, double-click Allow delegating fresh credentials with NTLM-only server authentication as shown in the screenshot below:
Step 2: Update the policy setting to contain the nodes
From the dialog that appears, toggle the radio button to Enabled and click the Show Contents button. Add entries to the list for each node where credentials will be used in a role script in the form WSMAN/hostname. You can use IP addresses, computer names (if powerdelivery is running on the same network), fully-qualified domain names, or wildcards here for a domain such as WSMAN/*.mydomain.com.
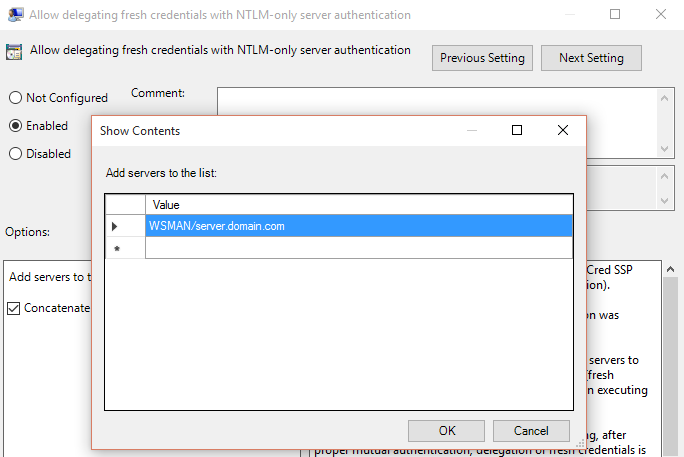
Once the servers have been added, click OK and close gpedit.
Step 3: Update environment to use CredSSP authentication
When role scripts that run on these nodes use credentials in their PowerShell commands, they will be passed correctly as long as the Authentication in the environment settings for those nodes is set to CredSSP.
The environment script below demonstrates this for the example configured above:
$@ {
  MyNodes = @{
    Hosts = "server.domain.com",
    Authentication = "CredSSP",
    Credential = "someone@domain.com"
  }
}